Pre Plumbed Basement Bathroom
Looking to finish off your basement and include a bathroom? Interested in learning more about PEX plumbing and its advantages? How about tiling your basement bathroom shower like a wild man? Welcome my friend. Grab a Fat Tire because this post is for you.

Rough In Plumbing
The first step in any proper basement bathroom finish project is the plumbing. Maybe you've got pipes already roughed in, maybe you don't. If you don't, get ready to familiarize yourself with a jackhammer because you're going to be busting up some concrete. Even if you've got your basement bathroom plumbing already roughed in, there's a good chance those pipes aren't in the right spot and don't fit your basement finishing plans. Once again, get ready to familiarize yourself with a jackhammer.
Moving the plumbing was something I didn't have to worry about because we decided to put our basement bathroom right over our rough in pipes. I'm not going to get in-depth on this because I don't have the experience, but if you do have to move your basement bathroom plumbing don't let this project scare you. Here's a decent introductory video on what it would look like to bust up your concrete slab and install the bathroom plumbing: https://www.youtube.com/watch?v=dKfQDiu0qhU
Basement Bathroom Plumbing With PEX
 Let's jump right in with my decision to use PEX pipe for my basement bathroom plumbing. I made this decision for a few reasons:
1) It's Flexible
– That means I didn't have to worry about soldering a joint every time I needed to make a turn, like you would have to do with traditional copper pipe. This also reduces the chances you'll have a weak joint in your plumbing because you won't have any!
2) Saves You Time
– As a result of not having to solder at every turn, you save an INCREDIBLE amount of time installing PEX piping. If you've followed any of my other posts I'm big on saving time and this is a huge time saver.
3) Saves You Money
– PEX pipes are cheaper than copper piping! Enough said.
4) PEX Pipes Less Likely to Freeze
– If you live in an area where you're subject to freezing temperatures, you're probably familiar with frozen pipes. Say goodbye to frozen pipes with PEX. The flexible nature of PEX plumbing allows water to freeze and thaw typically without any issues.
5) PEX Has Proven Itself
– If you check into the history of PEX, this stuff was used way back in the 30's. It was primarily used in commercial construction and in the 2000's it became standard for plumbers to replace copper piping with PEX piping.
If you're interested in using PEX piping in your basement finishing project I would highly recommend it. If you have questions about PEX that I don't cover in this post, just join my basement finishing forum on PEX piping.
PEX to Copper Plumbing
Chances are your existing plumbing is all copper piping, and if that's the case here's a step by step guide to tapping into your existing copper piping with PEX. First you'll want to locate an area where you'll be able to tap into your existing copper pipes. Our main floor bathroom was directly above our basement bathroom so it was easy to tap into the hot and cold copper pipes that led to the sink above.
1) Get Supplies
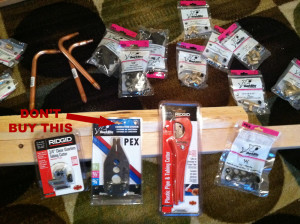 – Check out what I needed for my basement bathroom plumbing project. Notice the really crappy PEX crimper I initially bought to try and save some money. It didn't work at all, so I ended up spending more money on the heavy duty PEX crimper tool.
– Here are the tools I highly recommend for your project:
- Close Quarters Tubing Cutter (lower left)
- Plastic Pipe & Tubing Cutter (lower center)
- SharkBite Push-Fit Fittings (upper right)
- Heavy Duty PEX Crimper (not pictured)
– Everything else you'll need is pictured but these four tools will make your basement bathroom plumbing project much easier.
2) Turn Your Water Off, Drain Your Pipes
– Don't make this rookie mistake. Cutting into your existing pipes without turning off the water first is a recipe for disaster, one that wouldn't be very easy to explain to your wife.
– First turn your water off then turn on all the sinks, showers, tubs, in your house until your pipes are clear of water.
3) Cut Your Copper Pipes
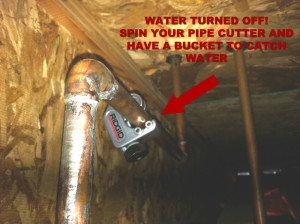 – Grab your pipe cutter, open it up and place it around your copper pipe.
– To ensure a clean cut tighten the cutter until you make contact with the copper pipe and spin it around the pipe. When the cutter spins easily, tighten and spin it again. Do this over and over until you've cut through the copper pipe cleanly.
– Be sure to grab a bucket for any water left in your pipes.
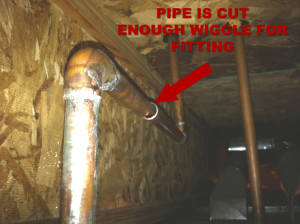
4) Insert SharkBite Fittings
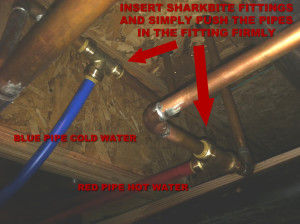 – My pipes had enough wiggle to allow for the SharkBite fitting to fit firmly in place where I had cut the copper pipes. You may want to cut a small section of pipe away to ensure the fitting is seated correctly and not causing your copper pipes to bend.
PEX in the Basement Bathroom
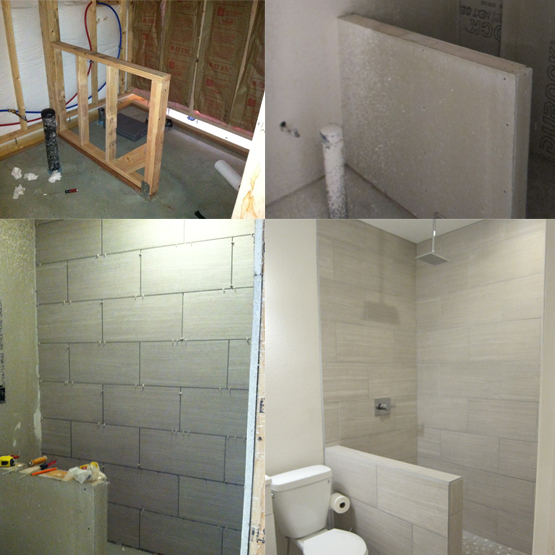
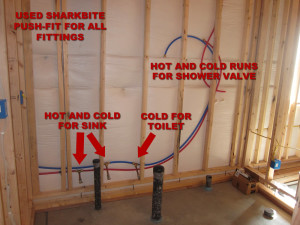 After you've tapped into your existing plumbing, run your PEX piping through the wall behind your basement bathroom sink, toilet, and tub/shower. Again I chose to use the SharkBite push-fit fittings for both the sink and toilet. The shower valve I purchased came with PEX barb fittings, which in turn require metal rings and a crimping tool to ensure a solid fitting with no leaks. I decided to run a small copper pipe from inside the wall so instead of seeing PEX pipe coming out of the wall you saw a copper pipe.
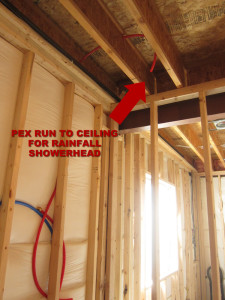 I then made one additional run of PEX piping from the shower valve location up into the ceiling joists for the rainfall shower head. You can see I also capped off the hot and cold runs with SharkBite push-fit plugs so we could turn our water back on.
Shower Valve
This is one section in which I didn't take enough pictures so I'm going to walk you through what I purchased and how I mounted my shower valve.
I ended up going with a Delta Shower Valve and Delta Vero Shower Head and I highly recommend both products. Check them out here:
Delta Shower Valve
Delta Vero Series Shower Trim
Here's a great video on mounting the shower valve with PEX piping along with using the crimping tool that I suggest purchasing. Every situation is different, but understanding the gist of mounting the shower valve and using the crimping tool is the most important part. Once you understand that it's a very straightforward project.
Installing the Bathroom Exhaust Fan
More to come on how to install a bathroom exhaust fan.
Tiling The Shower
Stay tuned as I post more updates on finishing the basement bathroom, including tiling the VIP shower!

Questions? Join my basement bathroom finishing forum.
Godspeed,
Tony
Share This
Source: https://www.howtofinishmybasement.com/finish-a-basement-bathroom/


0 Komentar